PhotobucketHomeHomeHomeHomeHome
PhotobucketPhotobucketPhotobucketPhotobucket
Showing posts with label Photography. Show all posts

Liam's First Holy Communion Dessert Table

Last weekend, we had the pride and privilege to share our eldest son Liam's First Holy Communion.   It is such a special religious milestone, and we brimmed with pride at our young man.

We wanted a small but special celebration and decided to invite our very nearest and dearest family and friends to celebrate with us at home after the church service.

When thinking about themes, because that is what I do, I wanted something symbolic but not overtly religious.   I toyed around with using patterns and colours as a theme and then I thought of stained glass windows - no more symbolic than that!

Onto the invitations and of course Nicole at Pretty and Print knew what I wanted immediately and her papery were nothing short of spectacular.    I boxed up with the invitations and they were a simple and elegant start to our event.

Onto desserts!   Stained glass theme needs to have a stained glass cake and desserts.   That was easy enough to think through, but I wanted to match that with lots of crisp white.  For the backdrop, I went backwards and forwards with many different ideas - but while chatting with my design buddy, we came up with "string art".   That took me way back to school.    So with a big bit of MDF, some nails and a hammer and different coloured string - the backdrop was made and I LOVED, LOVED, LOVED it!   It was the perfect silhouette for the table.

Always trying to find a DIY project or trying my hand at my own thing, I wanted to make some of my own risers and cake plates.    The main riser at the back of the table is a long wood piece that I added some decorative wood feet to each end and painted white.   The rectangle cake plates at the front of the table were made in the same way.    This way I could design my own table and design the tableware around my thoughts.   

The green cake stands on each side are simple white candle sticks from IKEA with wooden circles secured on top and then painted in my lime green colour.   All of it came together to make the clean look of the table that I wanted.   My table was not a huge table and I needed to utilise my space and I did not want it cluttered at all.   My riser at the back was used as the display piece for the coloured candy in my design colours.    All the candy was supplied by Leanne at Sweet Style.    No fancy glass candy jars here, just plain tall drinking glasses.


Then onto the actual sweets for the sweet table.    The cake – I wanted to make a stained glass effect cake and WOW I loved how it looked.   The  black lines were all piped on in their various lines and then all the windows were hand painted in different shades of the design colours.   This was the perfect centrepiece for the table.   I wanted to have a simple and uncomplicated array of coordinated desserts.   Handpainted watercolour cookies were a colourful addition and the marbled macarons were sensational.   The macarons were made by the macaron goddess Its a Cake by Jhoanee.   Layered and coloured petit cakes stood at the front of the table and were topped with royal icing stained glass disks.   Then the only other desserts were pannacotta shots topped with mini macarons. 


Lastly, our celebration was a small family and friends affair and this allowed for small and intimate table arrangements for the guests.    Flowers for each table were the centrepiece and arrangements of blue hydrangeas and baby hydrangeas were natural looking and bought colour to the table.    Little glass jars filled with little flower buds completed the table flowers.    I included the printables into our table setting in the form of placemats for everyone.    I loved how these set off the blue china perfectly.


All in all, we had a beautiful day with our nearest and dearest.   It was a day filled with laughter and love and joy at seeing our boy become a young man.

Please enjoy these images and a little glimpse into our special day!

My boy Liam.    He was actually quite sick in the lead up to this day and was not at all himself.

Sharing the day with so many wonderful people that we are privileged to share our life with.


Gorgeous invitations by Pretty & Print

Table settings.   Lots of fresh flowers, coloured glass and printed placemats by Pretty & Print made the perfect table scape.

 
Love my placemats!


Stained glass dessert table.

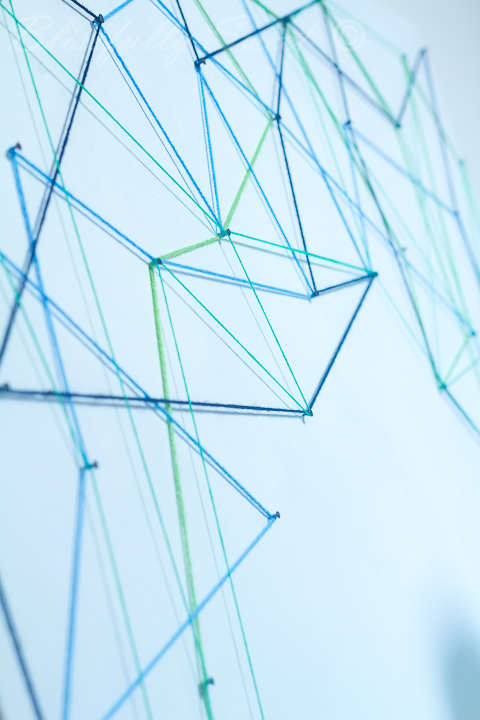
String art backdrop made by me.
All desserts by me.   Macarons by Its a Cake Thing by Jhoanee


Coloured candies by Sweet Style.


Even the inside of the cake was colour coordinated.


I hope you enjoyed this little look into our special day.

Cake, sweets, tableware, styling and photography by Blissfully Sweet
Papery by Pretty & Print
Macarons by Its a Cake Thing by Jhoanee
Candy, Milk glass cake stand and white compotes by Sweet Style.


{Recipe} Mascarpone, Mango & Hazelnut Tart

It is now coming into the warmer months and hooray, we are welcoming all our summer fruits.  Nothing screams summer to me more than days at the beach followed by sticky hands and arms after sucking all the goodness out of a box of mangoes!

An impromptu family BBQ last weekend had me at the shops that morning and wondering what I could make for something sweet.   Mangoes were in my trolley and as I walked down the dairy aisle, mascarpone soon joined the mangoes.   Seeing these two now best buddies sitting side by side in my trolley, I knew what I wanted to make for dessert.   A few more ingredients and homeward bound we were.

My grand plan for dessert was for an open tart of stacked rectangles of puff pastry that was layered with a mascarpone cream and then slathered in juliennes of fresh mangoes and if you know me, you know I love texture, some chopped freshly roasted hazelnuts also.

Lots of ooohs and aaahs when I bought out dessert and I was pretty impressed with myself.  So I took a couple of happy snaps and onto the cutting.   Needless to say - this dessert ate MUCH better than it was plated!   Trying to cut through the puff pastry as well as the fresh mascarpone was not a pretty plating experience for the guests, however this was not their concern, as soon enough their faces were dipped firmly into the tart!

The next day, there was a smidgeon left over {gasp!}    I left this last vestige of the dessert for my hubby (such a caring wife) for an after dinner treat.  Being the nice hubby he is, he allowed me to take a piece off the corner ;P!   I was happy to note that the next day, the tart was even a little better (if possible) than the day before and MUCH easier to serve.  


So this had me thinking then.   Did I really want to have to go through the plating scenario again if I had a dinner party?    The mission was set, time to get the mini tart pan out.

HUGE success!   If I had a choice between the two, I would pick the mini one probably.   Only because that I love everything in mini and also that in my mind the minis have less calories!


ummm yep, that was the taste testing bite!


Surprise, surprise, I decided to go one step further!!!    Maybe it is the Italian family heritage or maybe it is the part in me that really loves a bit of savoury with my sweet, but some aged balsamic syrup was the perfect finishing note to these tarts.   You may not be like me, and not want that slight bitter tang, but believe me it is goooood!


So on that note, maybe I should leave you with this recipe!


Mascarpone, Mango & Hazelnut Tart/s

2 sheets of puff pastry cut into half (to make 2 rectangles)
OR
Shortcrust pastry mini tart cases (use your own pastry recipe or buy some good quality pre made ones)
500 gms tub of mascarpone cheese
1 cup icing sugar (sifted)
300mls thickened cream
1 fresh mango, cut into juliennes
1/2 cup freshly roasted hazelnuts, lightly chopped
Aged balsamic glaze (if desired)

**These quantities suit the puff pastry open tart option.   You may want to quarter the size of the filling ingredients when making the mini tarts.   But the mascarpone mix can be made and then stored in the fridge for 3 days.  To use again, just quickly rewhip and use as a topping for a cake, filling for cannoli etc etc.

Puff pastry option
Place the puff pastry rectangles on baking paper in an oven at 160oC for 10-15 minutes.   After 10 minutes take out of the oven and very carefully using an oven mitt, press the rising puff pastry back down and then put back into the oven for another 5 minutes or until slightly golden.

To make the mascarpone mix, in your mix master whip the mascarpone until fluffy and slowly add your icing sugar until incorporated and then whip until nice and fluffy.   In a separate dish, whip your thickened cream until it has soft peaks and then gently mix the cream into the mascarpone mix.

Let the pastry cool completely and assemble your layers of mascarpone, mango and hazelnuts.

Lightly drizzle over your balsamic glaze as desired - remember a little goes a long way.

Refrigerate until serving.

Mini- Tart Option
Make the mascarpone mix as above.   Assemble your short crust pastry shells on your serving dish and then pipe (or spoon) a generous dollop of the mascarpone into each shell.   Top with then juliennes of mango and sprinkle with the crushed hazelnuts.

Drizzle over your balsamic glaze and refrigerate until serving.

It is hard to say how many tarts this way make as each tart case is made differently - but the mix should be enough for 2 dozen mini tarts.


I hope you enjoy this recipe.   Such an easy option for a dessert tasting plate at your next entertaining event.

xx


Cakes for LUXE Photo Shoot


A few months ago, I was asked by Lina of Chanele Rose Flowers to make some cakes for her upcoming LUXE photo shoot.  

All I knew was that the theme was LUXE and the colour palette to be used was gold, silver, peach and ivory.    I felt very honoured that alongside my cakes, Patricia from Yummy Cupcakes was also asked to make a cake also.   I was a tad nervous as Patricia is my idol for all things cake, so I needed to think!

I decided to get my inspiration from the colour palette as well as from couture fashion.   To me, nothing screams luxe more than sequins, ruffles and stripes.

So, to the drawing board I went and this was the result!  

Photo shoot styled by Chanele Rose Flowers & Events.

The cakes at the shoot.   My cakes are 1, 2 and 4.   Cake #3 is by Yummy Cupcakes.
Photograph by photographer Hannah Lundberg Photography

Onsite photo by me

My Sequinned Metallic Cake

Based on the colour scheme of the shoot, I wanted a cake that screamed LUXE! Metallics do that for me as well as couture elements like sequins, ruffles and stripes.


The first of my trio, was the sequinned cake. The background of the cake is peach metallic coloured and then it was pain stakingly covered in 3000+ tony fondant sequins and then hand painted. To see this cake shimmer in the light was a thing of beauty for me!


My Art Deco Inspired LUXE cake.

When thinking of this cake for the trio, I wanted a modern art deco type of cake, so to start I positioned the tiers to one side for a more modern feel. Then the extended bottom tier was covered in stripes going different ways and then all hand painted in metallic tones of gold, peach and ivory.

The top 2 tiers were left plain in a ivory metallic finish and then I included a metallic fan detail to cascade from the top.

My Art Deco inspired cake


The Romantic Ruffle Cake

I angst over the design of the 3rd cake and wanted to do a ruffle cake of some sort, but something different. I opted for a single wide ruffle that opened at the front to an ivory metallic base. The top tier was simple adorned with little ruffled blooms with gold shimmery centres.

My romantic ruffles cake
More photos from the shoot will be released at a later date!


A Blissfully Sweet Easter


Our Blissfully Sweet Easter weekend started on Thursday with Ben's Easter hat parade! This was not my original design, I had intended on a bunny sitting in the nest but after I made it the night before and saw it the next morning - it just looked scary! 

So with 30 minutes to spare, I glittered up some foam eggs and stuck them on the nest and hey presto - Easter hat! Benny loved it and he had fun with his friends!


Easter Sunday morning started with a treasure hunt for the eggs. Liam was getting way too crafty for our previous run and find the eggs tradition, so clues needed to be made. I found (late the night before) a little template online and made up my own clues. 

They had 12 clues to find around the house and it was fun to watch Liam decipher them and then Benny & Noah ably assist him with getting the eggs once found!


Onto the menu for the day! I had no intention of doing a dessert table. But I had some Easter gifts for the kids and some chocolatey desserts for after lunch, so I decided to throw it all on a table the night before! (I really am a night before person!)

I cut out bunny silhouettes and everyone got their own printed menu, which read:

to start:
Green curry prawns with vermicielli

then:
Slow roasted pork belly
Potato & leek mash
Autumn salad
Pumpkin & ricotta filo tart

something sweet:
Chocolate, orange & almond cake
Chocolate mousse with orange marscarpone
Chocolate/jaffa bark
Orange jelly pots (for the kids)

YUMMO!


The Dessert Table

I do not make fancy decorated cakes for my own occasions - I like something different! I themed the whole dessert part of menu around an chocolate/orange theme.

Little glass jars held mini Lindy bunnies with speckled mini eggs as gifts for the kids. Chocolate desserts of all kinds were on display!


Pretty yellow blooms in a white jug with my ceramic white bunny, was just the right fit.

On the bottom of the table I had baskets ready for the Easter egg huny as well as Easter gifts for my nieces. They each got beautiful pink ceramic and glass plate sets that I found at IKEA and they were so pretty and whimsical - the perfect gift!


Nicole from Pretty and Print made up these gorgeous Easter labels for me from her Easter collection. They fit perfectly with the colour theme and the little personalised bunny tails from Liam, Ben & Noah were a mix of marshmallows and candy coated eggs!


The desserts:
A decadent flourless chocolate, orange and almond cake
Chocolate mousse pots with orange marscarpone
Orange jelly pots
Chocolate and jaffa bark


Olivia & Elan definitely loved their chocolate dessert! Soooo gorgeous!


Then onto the kiddy hunt! I basically festooned our backyard with hunting eggs and away they went - like pros! Noah got right into it and of course, tried to eat the eggs with foil and all! 

He is obsessed with talking on the phone (do not know where that comes from???!!!!), and walked around pretending to speak to the Easter Bunny to tell him more eggs were required!


My Benny!

Ben was such a great helper showing the babies what to do. Once Noah cottoned on to it all - he immediately tried to get eggs out of Ben's basket! Ben being the sweetheart that he is - let him! ♥


and then there is the prankster Liam!

Liam's main Easter egg was a Great White Shark egg. He insisted on walking around with the box on his head afterwards! Then he tried to trick the kids with hiding their eggs! hahaha


The girlies are on the hunt! They were super pros!


VERY VERY rare to get a photo of all 3 boys together! This was a split second photo and captured it all really! It was such a fun afternoon!
xxx


Then onto Easter Monday and more entertaining!

Good friends were coming over for a BBQ, so I needed to make a little effort at least! I pulled out my mother-in-law's beautifully hand stitched tablecloth and using the same decorations from the day before, just made a simple table setting! 

The day was a such a glorious day weather wise and sitting here eating our lunch was such a treat! The boys even had an afternoon swim!

For lunch I made:
Tabbouleh
Fried Rice
Baked, seasoned potatoes
Baba ganoush
With marinated steaks and seasoned sausages!

Such a nice lunch!


Then onto dessert. That morning I decided to revisit my lemon meringue recipe and make it again, as it is my friend Liana's favourite dessert!

This time I decided to make the meringue in peaks and it was even more delicious than the last time and those peaks were lighter than air!


Peaky goodness of lemon meringue pie!


One of my all time fave photos now of hubby & Ben! Love these guys to pieces!   Not only is hubby a big spunk - he can also cook up a mean BBQ!


We are lucky enough to back onto a park. So after lunch, dessert and a swim, the boys went out in the park for a game of football.

We followed with Noah after his nap and it was the perfect end to a perfect day! Our families both have 3 boys and we decided to do a tallest to shortest shot! 

Our boys have grown up together and hopefully will also grow old together!

It truly was a weekend filled with entertaining, friends and family and even more delicious food!


Happy Easter to everyone!


LinkWithin

Related Posts with Thumbnails